Tuesday, September 27, 2016

wsdl to cs generator using visual studio

wsdl to cs generator using visual studio


Step 1: Generate or Obtain the Web Service WSDLs for Your Organization


To generate the metadata and enterprise WSDL files for your organization:
  1. Log in to your Salesforce account. You must log in as an administrator or as a user who has the “Modify All Data” permission.
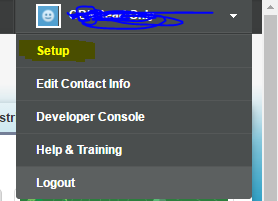
  2. From Setup, enter API in the Quick Find box, then select API.
  3. Click Generate Metadata WSDL and save the XML WSDL file to your file system.
  4. Click Generate Enterprise WSDL and save the XML WSDL file to your file system.

c:\Program Files\Microsoft WSE\v3.0\Tools\WseWsdl3.exe


VISUAL STUDIO COMMAND PROMTS
C:\Program Files (x86)\Microsoft Visual Studio 12.0\Common7\Tools\Shortcuts


To have the WSDL to Proxy Class tool generate a proxy class that derives from the WebServicesClientProtocol class, the .NET Framework SDK 2.0 WSDL.exe tool must be installed and accessible. When the SDK Command Prompt is used to run the WSDL to Proxy Class tool, the WSDL.exe tool is accessible.
Visual Studio Tools

Developer prompt command and run below command

WseWsdl3 {URL | path} [Options]

ArgumentDescription
URL
The URL to a WSDL file (.wsdl).
path
The path to a local WSDL file (.wsdl).

WseWsdl3 http://hostServer/WebServiceRoot/WebServiceName.asmx?WSDL /out:MyProxyClass.cs

Friday, September 23, 2016

Generate WSDL FROM salesforce system and How to convert WSDL file to class file

LOGIN to Salesforce

On right side 
Click on setup


then Search for API in search tab

Click on Generate enterprise wsdl 

Then its generates the wsdl and copy and paste it notepad

Save As "SDFC.wsdl"

How to convert WSDL file to class file

  1. In Solution Explorer right click on your project and go to "Add Service Reference..."
  2. Press "Advanced..." at the bottom of the window.
  3. Press "Add Web Reference..." at the bottom of the window.
  4. In the URL field enter the path to the file eg. C:\Documents and Settings\username\Desktop\filename
  5. Press Go arrow. Service description should display.
  6. Enter the reference name you wish.
  7. Press "Add reference".
  8. Watch Visual Studio do its magic and making your life easy.
  9. Take a break.


Thursday, September 22, 2016

Renamed Project, WSP name doesn't change

changed project name, still i'm getting wsp name visual studio

Open The Package.Package file and change then Name attribute.
Example
<package xmlns:dm0="http://schemas.microsoft.com/VisualStudio/2008/DslTools/Core" 
dslVersion="1.0.0.0" Id="d3150724-5644-479c-99f3-fc99af5bfdc6" 
solutionId="d3150724-5644-479c-99f3-fc99af5bfdc6" resetWebServer="true" 
sharePointProductVersion="15.0"
name="NEWNAME" 
xmlns="http://schemas.microsoft.com/VisualStudio/2008/SharePointTools/PackageModel">

Update or edit status filed in JIRA issue

the status field is a special case and can't be updated directly, which is the second problem here. Changing a status in Jira is called ...