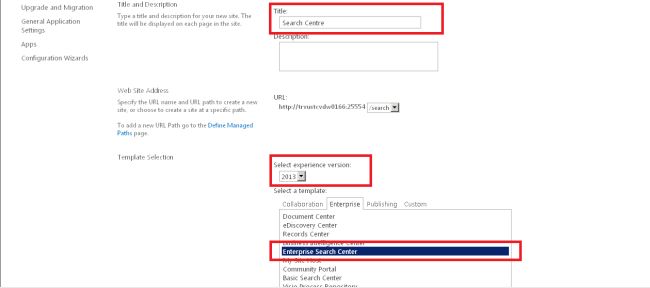
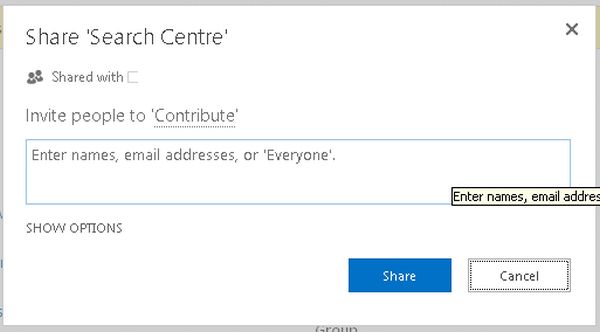
Thursday, July 30, 2015

Federating Search


Federating Search
Sometimes you may have too much content outside of SharePoint or maybe you have a system that already has a capable search engine (i.e.: an ERP or another document management system).  This calls for federated search. As another example, you might use a federated search to display results from your public facing web site or from a public search engine like Bing.  You don’t want to completely index their data, but you would still like to see results from those external systems when searching from SharePoint.  The Federated Search feature allows you to display results from any search engine supporting the OpenSearch 1.1 protocol alongside your local search results.  If you are not familiar with OpenSearch, the results come back as an RSS feed.  Even if your external system doesn’t support OpenSearch, you can write some code to refactor the results as RSS and integrate them 
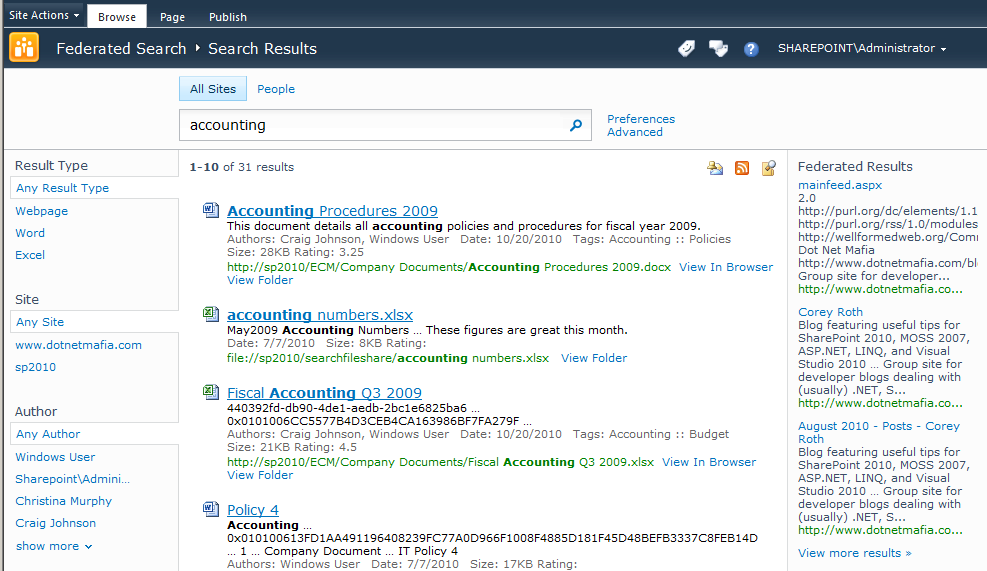
easily into SharePoint.  Here is an example, where the federated results come from DotNetMafia.com on the right side of the screen.
Exposing SharePoint Search to other applications


Search Reports
The search reports capture the user behavior information related to the queries on the site.
Trend Reports
1.     Number of Queries: Total number of queries each day.
Rank Reports
1.     Top Queries: Most issued queries per day.
2.     Failed Queries: Most issued queries for which either there were no results or the user did not click on any results.
3.     No Result Queries: Most issued queries for which no results were returned.
Other Reports
1.     Best Bet Suggestion Report: Recommends URLs as most likely results for particular search queries based on analysis of usage patterns. The site administrators can accept or reject these suggestions. If they accept, the corresponding query-URL pair is added to the search keywords list.
2.     Best Bet Usage: Shows how Best Bet suggestions are doing over time. For every Best Bet query issued, the report shows the percentage of clicks on the Best Bet URL compared to other URLs.
3.     Best Bet Action History Report: Tracks the actions performed by the site administrator on the ‘Best Bet Suggestion’ Report.
Report Scope
Site
Site Collection
Web Application
Search Service Application
Number of Queries

check[51]
check[53]
check[55]
Top Queries

check[59]

check[57]
Failed Queries

check[61]


No Result Queries


check[63]
Best Bet Usage

check[65]


Best Bet Suggestions

check[67]


Best Bet Suggestion Action History

check[69]


Table 2:  Summary of the search reports availability at different SharePoint component hierarchy levels

Get Search Analytics Reports programmatically in SharePoint 2013

How to get Search Analytics Reports programmatically in SharePoint 2013

Console application

using System;
using System.Text;
using System.Collections;
using System.Collections.Generic;
using Microsoft.SharePoint;
using Microsoft.SharePoint.Administration;
using Microsoft.Office.Server.Search.Administration;
using Microsoft.Office.Server.Search.Analytics;


namespace SharePointConsoleApplication2
{
    class Program
    {
        static void Main(string[] args)
        {
            SPSite site = new SPSite("http://YourseverName/sites/Ptrends/");
            SPUserToken userToken = site.UserToken;

            SPSecurity.RunWithElevatedPrivileges(delegate
            {
                using (SPSite site1 = new SPSite(site.ID, userToken))
                {
                    SPServiceContext context = SPServiceContext.GetContext(site1);
                    SearchServiceApplicationProxy searchProxy = context.GetDefaultProxy(typeof(SearchServiceApplicationProxy)) as SearchServiceApplicationProxy;
                    AnalyticsItemData usageData = searchProxy.GetRollupAnalyticsItemData((int)SearchReportTypeId.TopQuery, Guid.Empty, Guid.Empty, Guid.Empty);

                    int dailyHits = usageData.GetHitCountForDay(DateTime.Today);
                    int monthlyHits = usageData.GetHitCountForMonth(DateTime.Today);
                    Console.WriteLine(String.Format("Report Daily Hits={0}; Monthly Hits={1}", dailyHits, monthlyHits));

                    uint maxRows = 1000;
                    DateTime startDate = new DateTime(2015, 7, 1);
                    var searchResults = searchProxy.GetSearchReport((int)SearchReportTypeId.TopQuery, Guid.Empty, Guid.Empty, startDate.Date, true, maxRows);
                    if (searchResults.Count > 0)
                    {
                        foreach (QueryReportData rptData in searchResults)
                        {
                            int hitsCnt = rptData.Count;
                            string qry = rptData.Query;
                            Guid scope = rptData.Scope;
                            Console.WriteLine(String.Format("Report Count={0}; Query={1}; Scope={2}", hitsCnt, qry, scope.ToString()));
                        }
                    }
                }
            });

        }
    }
}

Friday, July 24, 2015

Configure Outgoing emails in Sharepoint server

To install the SMTP service
  1. Verify that the user account that is performing this procedure is a member of the Administrators group on the front-end web server.
  2. Click Start, point to Administrative Tools, and then click Server Manager.
  3. In Server Manager, click Features.
  4. In Features Summary, click Add Features to open the Add Features Wizard.
  5. On the Select Features page, select SMTP Server.
  6. In the Add Features Wizard dialog box, click Add Required Roll Services, and then click Next.
  7. On the Confirm Installation Selections page, click Install.
  8. On the Installation Results page, ensure that the installation is complete, and then click Close.
To Configure SMTP Server:
1.      Click Start, point to Administrative Tools, and then click Internet Information Services (IIS) 6.0 Manager.
2.      In IIS Manager, expand the server name that contains the SMTP server that you want to configure.
3.      Right-click the SMTP virtual server that you want to configure, and then click Start.
4.      Right-click the SMTP virtual server that you want to configure, and then click Properties.
5.      Go to Access Tab Click on Authentication and Check Anonymous Access than click OK.
6.     

7.       Click On Relay and Choose All Except List Bellow


8.       Click On Delivery Tab, Outbound Security provide Credentials Click On OK
9.       Click on outbound Connections Change port 25 to 587
10.   Click on Advanced and following details
11.   Configure Outgoing mails from CA

SharePoint Search Center site

REFERENCE :- http://www.c-sharpcorner.com/UploadFile/Roji.Joy/how-to-configure-search-centre-in-sharepoint-2013/

https://technet.microsoft.com/en-us/library/hh582314.aspx


SharePoint Search Center site
  1. Verify that the user account that is performing this procedure is a member of the Farm Administrators group.
  2. On the home page of the Central Administration website, in the Application Management section, click Create site collections.
  3. On the Create Site Collection page, do the following:
    • In the Web Application section, select a web application to contain the new site collection. To use a web application other than the one that is displayed, click the web application that is displayed, and then click Change Web Application.
    • In the Title and Description section, in the Title box, type the name for the new Search Center site. Optionally, type a description in the Description box.
    • In the Web Site Address section, for the part of the URL immediately after the web application address, select /sites/, or select a managed path that was previously defined, and then type the final part of the URL.

      SharePoint-Search-Center-site.jpg


    • In the Template Selection section, do the following:
      • In the Select the experience version drop-down list, select 2013 to create a Search Center site that provides the SharePoint Server 2013 user experience, or select 2010 to create a Search Center site that provides the SharePoint 2010 Products user experience.
      • In the Select a template subsection, click the Enterprise tab, and then do one of the following:
      • If you are using SharePoint Foundation 2013, select the Basic Search Center template.
      • Otherwise, if you are using SharePoint Server 2013, select the Enterprise Search Center template.
     
  4. In the Primary Site Collection Administrator section, in the User name box, type the user name of the primary site collection administrator for this site collection in the form domain\user name.
  5. In the Secondary Site Collection Administrator section, type the user name of a secondary site collection administrator in the form domain\user name.
  6. In the Quota Template section, select No Quota.
  7. A Search Center site is not intended to be a data repository. Therefore, you do not have to select a quota template.
  8. Click OK.
  9. On the Top-Level Site Successfully Created page, click the link to the Search Center site that you created.

    Created-Search-Center-site.jpg
     
  10. After you create the Search Center site, you must grant site access to users so that they can perform search queries and view search results. Use the following procedure to grant site access to users.
To grant access to the SharePoint Search Center
Use the following to grant access to the SharePoint Search Center:
  1. Verify that the user account that is performing this procedure is a member of the Owners group on the Search Center site.
  2. In a web browser, go to the Search Center site.

    grant-access-to-the-SharePoint-Search-Center.jpg
     
  3. Open the Site menu by clicking the gear icon in the upper-right portion of the page, and then click Site Permissions.

    Sharepoint-Site-Permissions.jpg
     
  4. In the Shared with dialog box, click Invite people.

    Shared-with-dialog-box.jpg
     
  5. In the Share <SearchCenterName> dialog box, in the Enter users separated with semicolons text box, type the names of the Windows user groups and Windows users to whom you want to grant permissions for submitting queries and viewing search results in the Search Center.

    Share-SearchCenterName.jpg
     
  6. For example, to grant access to the Search Center to all Windows users, type NT Authority\authenticated users.
  7. Click Show options.
  8. Clear the Send an email invitation check box.
  9. In the Select a group or permission level drop-down list, select <SearchCenterName> Visitors [Read].
  10. Click Share.  

Tuesday, July 21, 2015

Migration SharePoint 2007 to SharePoint 2013

There are two way for migration SharePoint 2007 to SharePoint 2013 and the way is
1. Database attach

2. Content migration
 
Database attach:
- This option upgrades the database schema by attaching a content database from SharePoint 2007 to SharePoint 2010.

-Then you upgrade again by attaching it to SharePoint 2013. This requires an intermediate environment of SharePoint 2010.

- Essentially, it involves twice the migration effort and an extra environment to build and support.

Content migration:
- This option allows for direct migration of content from SharePoint 2007 to SharePoint 2013.

- It does not involve the upgrade of the database schema.

- It requires a third-party migration tool and can be run directly on the target SharePoint 2013 environment. In short, the tool scans the current SharePoint 2007 sites and libraries, creates new sites and structures in 2013, and copies content to the new libraries and lists while retaining the metadata, security and other properties.

These are tool's
1. AvePoint DocAve

2. Axceler ControlPoint

3. Sharegate

4. Metalogix Migration Manager for SharePoint

5. Metavis Migration Suite

6. Quest Migration Manager for SharePoint


Update or edit status filed in JIRA issue

the status field is a special case and can't be updated directly, which is the second problem here. Changing a status in Jira is called ...